Monday, May 12, 2014

HOW TO: Share Your Peach Milkshake

You buy a milkshake. Everyone wants a sip, but no one is exactly sure how to make it fair. Let's be honest, you want to be the dominate sipper without others' recognizing it. You've been there before. Well, fret no more! I'm going to share with you a cute and crafty way to secretly dominate the sipping and fancy up your milkshake sharing experiences.
1. Count how many people want a sip of your milkshake.

2. Take the number you counted to and memorize it.

3. Go to the straw dispenser and get that same number of straws.

I had counted to 3, I picked up 3
4. Open the straw wrapping.
Like this.
5. Remember the number you counted to... think of a shape that has the same number of vertices. 
(2- line segment, 3-equilateral triangle, 4-square, 5-regular pentagon, 6-regular hexagon, 7-regular hexagon, etc. )

6. Place the straws in your milkshake in that shape.
equilateral triangle
7. Sip...and secretly dominate. 


Sunday, May 11, 2014

How to get and use a banana slicer.

How to get and use a banana slicer.
Maybe you have seen this banana slicer before in the grocery store. Today, I am going to tell you how to get and use one of these.

STEP 1: Go on a Disney cruise. Why is this important? What does it have to do with a banana slicer? That will become significant in a minute.

STEP 2: Meet a really cool guy named Joe. Joe will be crucial in your banana slicing journey. (PS-this step is CRUCIAL. If you go on a Disney cruise and do not meet a cool guy named Joe, you MUST return to step 1.)
STEP 3: Invite Joe to come and stay with your family for a fun-filled vacation.
STEP 4: Have Joe buy you a banana slicer. (This may or may not be a tricky step. Some people find that their friend Joe will just give them a banana slicer on his own. Others have found that their friend Joe has needed a little hint here and there to give them a banana slicer.)
STEP 5: Slice your banana with your new banana slicer.


Wednesday, April 23, 2014

DIY: Remodel your Living Room (on a budget!)

DIY: Remodel your Living Room (on a budget!)
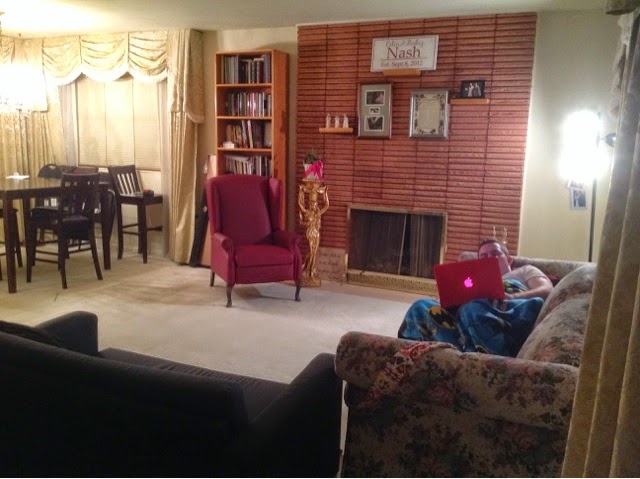
BEFORE
This is how our living room looked before we moved in. I liked the natural sea tones of the chairs and the cherry brick reminiscent of the Washington blossoms.  We wanted to keep the organically gothic golden elegance of the room, but throw in our own modern touches. After a few minutes of work, we turned it into this...
AFTER
Being the giver that I am, I'll go ahead and tell you some of our best secrets in Q&A form.
FAQ:
1. Q: What if you don't quite have the funding for a sectional? 
     A: three thister writes: no problem! Just grab the 2 couches you do have and slide them together. As you can see, I was pretty lucky to have a floral couch and black couch with colors that seem to pull together naturally, like a cloudy spring day.

2. Q: What if you really want a different fire place with built in book shelves and a mantle to boot?
    A: Three thister writes: Just imagine you have it with all the frills. Then the red brick will grow on you. Using your imagination on a daily basis costs you absolutely nothing!

3. Q: What do I do if I have a scantily clad golden statue woman in my living room?
    A: three thister writes: How I was hoping you would ask! I was so proud of how we integrated our statue so naturally into our new room! This calls for a couple more pictures: 
   BEFORE
AFTER
Total transformation! Keep this between us, but I'm actually working on a cute little outfit for our sweet little Broom-Hilda!

Believe it or not, my husband and I did this remodel all for the price of.... 68 cents!
Here's the break down: 
2 prong plug in with a 3 prong opening.....68 cents. 

Stay tuned for our upcoming kitchen and bathroom remodel (on a budget!)!


Monday, April 14, 2014

don't have a paint stirrer to stir my paint with

I tried to compose the title of this post so that you would land on it with a Google search if you were having this particular problem. Just one of the many courtesies you'll find here at Three Thisters.

A number of months ago, I was painting a few pieces of furniture in my garage. I realized after popping the can of paint open (worthy of a blog post in itself) that I had neglected to purchase a paint stick when I bought my paint.

This was a problem because the instructions told me to stir the paint before using and then periodically after that.

Well I don't know about you, but just as I'm sitting down to start a project is the moment I least want to have to run to the store again. I decided I was going to come up with a solution, and after digging around my house a bit, this is what I was able to come up with.

I'll be happy to share with you some directions on how to slap one of these together.

1. Gather materials.

I forgot to put scissors. I hung a lot of posters one summer and got real good at just ripping that duct tape with my fingers or my teeth. But if you need scissors for that part, use them.
 
2. Determine how tall your paint stirrer needs to be. I kinda held the knives stacked on top of each other next to the paint can to see how tall it needed to be, and I determined two knife lengths would be good.

3. Figure in reinforcement. That paint is thicker than it seems. If you were to just tape two knives together, your stirrer would probably be too flimsy. If you look real close at the picture, you'll notice a third knife taped to the back of the first two. I was glad I did this.

4. Tape the whole thing together. Don't be intimated about the tape job. Just stick the tape where it will be the most useful in holding your knives together.

We're hosting a linky party with this post, if you were able to successfully construct a paint stirrer, share it with us! Include a picture of your paint stirrer.

Monday, March 31, 2014

15 Reason Why Hailey Needs a Pinterest Account

#1. She just moved into an awesome old new house. (For real, it's pretty sweet!) And there are millions of things on Pinterest like this:

Re-Styling Your Home Without Remodeling. You can do it yourself - This is OUR house! Mid '80s, hasn't been updated since Full House was on TGIF! LOL! Great ideas to update your '80s house on the cheapBathroom remodeling — a checklist of 84 costs to consider — Retro Renovation15 kitchen mini makeover ideas!


#2. Her husband has one.
Yes, her husband has a Pinterest account, and she doesn't.


#3. It sometimes gives you a "blast from the past"
one of the greatest shows
cheeseburger doing yoga - Even StevensSaved By The Bell throwbackkk... bring me back to the days of exceptional sitcoms


#4. It's important to be able to say: "I saw this really cool thing on Pinterest..."

#5. She likes to cook.

50 delicious slow cooker recipes on iheartnaptime.net ...so many yummy recipes!Best recipes for appetizers - my family has LOVED each one :) Top 10 Party Appetizer Recipes Roundup #recipe #appetizer #budgetsavvydiva via budgetsavvydiva.comTop 8 Healthy Recipes Read more here: http://myamazingrecipes.com/healthy-recipes-6/

#6. The Church has a Pinterest account.

#7. She is a teacher.
How to Make Spelling Fun and 25 Spelling Activities for Kids - awesome list with lots of variety35 Free Apps for Teachers! This great list of apps will save you time, money, and effort in integrating the best apps in instruction!People have been loving some ideas and I keep telling them that I saw it on Pinterest!

#8. It is the year 2014, Pinterest started in like 2010! That is 4 YEARS of pins she has MISSED!!

#9. One time she posted something on our family Facebook page so she would be able to remember it. Isn't that what Pinterest boards are for?

#10. Some pins make you laugh:
The longer I stare the better it gets.I hate when that happens.Thank you random citizen…

#11. It helps you remember some of your favorite movie lines:
Olaf - Frozen. LOVE this movie!!Princess Bride...love the movie & filled with some of the best quotes!Harry Potter, Hermione, Ron <3


#12. Sometimes it helps you realize you aren't the only one who hears lyrics incorrectly:
astronomy makes me appreciate this :)hate it!!
#13. It gives you an outlet for your current obsessions (i.e., my Frozen and Harry Potter boards)

#14. It makes you think of things you never would have thought of on your own:
HahaMine's called FBI Surveillance Tower :)Anti-Theft Lunch Bag...haha

#15. Sometimes it "pins" situations in life perfectly:
YES!very relatablethis is me.

#16. You feel really cool when someone pins your pin. Like you helped them discover a rare treasure. Sometimes you feel like say, "You're welcome."

#17. It has awesome sister quotes:
HAHAHHAHAAA - and true!Digital Print-Better Than-Nursery Art, inspirational, illustration, princess, superhero, boys, girls, children's room, quote, cute, decorQuote-Because I Have A Sister Ill Always Have A Friend-special buy any 2 quotes and get a 3rd quote free of equal or lesser value via Etsy

PS, Hailey, I couldn't handle it anymore. You now have a pinterest account. Your username is your email address, and your password is ******** (your birthday i.e. 0121 for January 21 and the last 4 digits of your phone #). Love you!!

Monday, May 13, 2013

Zebra Tray

I was feeling very crafty one day, my hands were just itching to make something. Since crafting is kind of expensive, I decided to use some resources I already had. I had some black spray paint leftover from a different project and done a few months ago and a pretty little tray that I keep on our automan to hold remotes, the Ensign magazine, etc. I purchased the little tray at Ross a few months ago. It has been serving it's purpose faithfully, helping us to keep track of our remotes and hold empty cereal bowls and cups until they are put in the dishwasher. I have really liked the tray except for one thing, it was all black except for the bottom which was zebra striped. Now, don't get me wrong, I have nothing against zebras (in fact, I like them very much) but I didn't feel the need to have something zebra striped in my family room. So, I figured, spray paint it black! Heck yes!
Heck no.
I spray painted it outside and left it out to dry. When I thought it was dry I brought it back inside. I placed it in it's regular place and set the remotes and magazine on it. It looked GREAT. The only problem was when I went to take a remote and the magazine off of it. Some of the black paint may have peeled off onto the remote and half of the back cover of the magazine may or may not have stayed on the tray.
I thought it might just need a little extra time to dry, so I gave it PLENTY of time. The problem is, it is still extremely sticky and things don't hesitate to stick to it.
See the flower-type thing in the back? That's where the spray paint was used originally.
See that white mark? The big one. That's a piece of the back cover of the magazine.
It is currently in our back room until I figure out something to do with it. (I'm thinking maybe some modge podge will help?) So, now instead of our ex-zebra tray holding our remotes and magazine on the automan, it is the checkerboard my husband made in his 9th grade shop class.
The 9th grade project